Recently, I wanted to use Ubuntu 11.10 instead of Windows 7 for my Android application development. So far, I'm liking Ubuntu a lot, it is super fast, free, has great interface and animation, easy to learn and has lots of free applications that suits my needs as a computer user and software developer. Now I'm thinking to be more of an Ubuntu Linux user than Windows user haha!
What is Ubuntu?
Ubuntu is a kind Linux Operating System that powers millions of net-books, desktops and servers all over the world. Using this amazing operating system is absolutely free of charge, and always will be. It is created and actively developed by the best open source experts from all over the world. I think this is the only open source operating system that looks great. I find it stylish, beautiful and fast.
Anyway, enough of describing Ubuntu, this post is about Installing Android development environment in Ubuntu 11.10. Here are the links on how I was able to successfully install my Android Development Environment on Ubuntu 11.10, these guides should be followed in order:
Install JDK 7 on ubuntu 11.10
Ubuntu Quick Tip: I just installed Java Development Kit (JDK) 7 on my newly installed Ubuntu 11.10 OS, yes, I'm gonna be using Ubuntu for my Android development stuff, this is how I did it:
1. Run the Terminal. You can do this by going to the Dash Home and search for "terminal"
2. On the terminal, type:
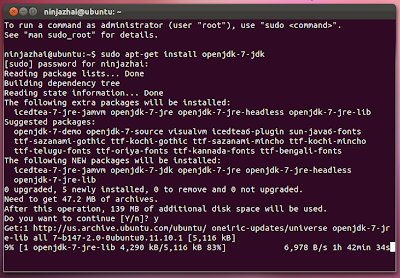
sudo apt-get install openjdk-7-jdk
3. The terminal will ask you to enter your admin password. After doing so, it will show you some data about what will be installed.
4. It will ask you again if you want to continue, just type Y (for yes) and press enter.
5. JKD download will start and...
 |
| Click to enlarge. |
will be installed.
 |
| Click to enlarge. |
Install Eclipse On Ubuntu
This post covers only how I was able to install Eclipse 3.7.0 IDE on Ubuntu 11.10. Eclipse IDE is used in most Android tutorials from Google, just like this Hello, World tutorial. Click here if you want to view the complete links on how I completed installing my Android Development Environment on Ubuntu.
I did the following simple steps to install Eclipse IDE:
1. Run Ubuntu Software Center
 |
| Click to enlarge. |
2. Search for "eclipse"
 |
| Click to enlarge. |
The image above is the screen shot when Eclipse was installed already. But when you search for "Eclipse" and you don't have Eclipse installed yet, you can see the Install Button (not remove button) at your screen, right across the Eclipse icon.
3. It will download Eclipse Indigo, Click Install Button
4. Wait while it downloads and apply changes (install)
Install Android Development Tools (ADT) on Ubuntu
Android Development Tools or ADT is a plugin for eclipse IDE that makes our life easier when developing Android applications. I think this is the reason why we highly recommend using Eclipse IDE during Android development. See easy to understand and great ADT description on this link. This post covers only how I was able to install ADT on Ubuntu 11.10. Click here if you want to view the complete links on how I completed installing my Android Development Environment on Ubuntu.
I made it work by doing the following simple steps:
First Part:
1. Open Eclipse
2. Go to Help > Install New Software
3. On the pop up, click Available Software Sites
4. Tick http://download.eclipse.org/releases/helios
5. Click OK
6. On the “Work With” drop down, choose http://download.eclipse.org/releases/helios
7. Please wait while it's Pending
 |
| Click to enlarge. |
8. Then it will list the available tools
9. On the list, tick Mobile and Device Development
10. Click Next > Next > Read and Accept the Terms > Finish
11. Wait for the software to be installed
 |
| Click to enlarge. |
12. Click OK if security warning appears
13. Restart Eclicpse
Second Part: When Eclipse was restarted.
1. Go to help > install new software
2. On the pop up Click Add
3. On the prompt, enter:
Name: Android ADT
Location: http://dl-ssl.google.com/android/eclipse/
4. Please wait for the Developer Tools to load while it is Pending
5. Tick the Developer Tools then click the "Next" button
6. Please wait while it loads
7. Click Next > Read and Accept the terms > Finish
8. Please wait while it install the software
9. Click OK if security warning appears
10. Restart Eclicpse
Hope this helps! Sorry for lack of screen shots (I actually hate doing lots of screen shots), I want you to believe in yourself that you can follow word instructions here even without pictures or screen shots, but if you have any questions or suggestions, leave your comment on the comment section below. Thanks!
Install Android SDK on Ubuntu
Android Software Development Kit (SDK) enables developers to create Android applications. It includes sample source codes, device emulators, required libraries and tools to build Android applications for mobile devices. Click here if you want to view the complete links on how I completed installing my Android Development Environment on Ubuntu. This post covers only how I was able to install Android SDK on Ubuntu 11.10.
Note: These steps should be performed after installing ADT and Eclipse was restarted.
1. Eclipse will prompt you to install Android SDK . Click Next
 |
| Click to enlarge. |
2. Choose Yes if you want to send usage statistics to Google
3. Click Finish
4. Wait for Android SDK manager while it loads
5. I choose accept all
6. Click Install
7. Please wait while it downloads
 |
| Click to enlarge. |
The steps above will install the latest SDK version, but if you want to install other SDK version, you can:
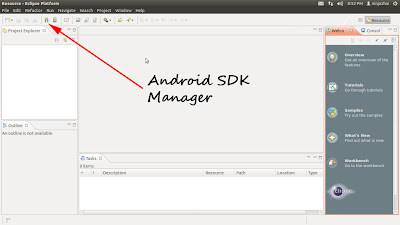
1. Run the Android SDK manager from eclipse
 |
| Click to enlarge. |
2. It will load available SDK
 |
| Click to enlarge. |
3. Tick your desired SDK version from the list
4. Click the Install button
5. Please wait while it downloads your selection
Proof
For FREE programming tutorials, click the red button below and subscribe! :)


website